
GEO Tutorial: Unlock a Hidden Potential of One-Line Expressions in ArcGIS Pro
Required Resource
ArcGIS Pro (tutorial developed using v. 3.1; v. 2.x or higher are compatible)
Featured Data Source
Overview
This tutorial focuses on comparing multiple field attributes in ArcGIS Pro. It explains how to incorporate a Python conditional statement into a short expression, run using the Calculate Field tool. You will also learn how to evaluate individual row values across multiple attribute fields. The goal is to assign each new field cell to one of two characteristics based on similarities and differences between the fields. This tutorial assumes a basic familiarity with ArcGIS Pro, but no programming background is required.
To pique your interest in this lesson, picture the following scenario: You have recently joined a GIS agency hired by the Association of Wetland Specialists to assess wetland changes in coastal Mississippi. You received a point file representing Woody Wetlands extracted from the 2001 National Land Cover Database (NLCD). Among a long list of requests, you’ve chosen to start with a change detection assessment. The following tutorial will teach you how to accomplish this task.
Step 1. Download and Review the Project Data
In this step, you will download data, open the map package, and review the provided dataset.
- Download the tutorial data using the link listed in the Featured Data Source section. Save it to a location on your local drive you will easily remember.
- Open the Compare_Fields.mpkx file with ArcGIS Pro. The points visible on the map cover the extent of Mississippi coastal counties and represent the 2001 Woody Wetlands sites.
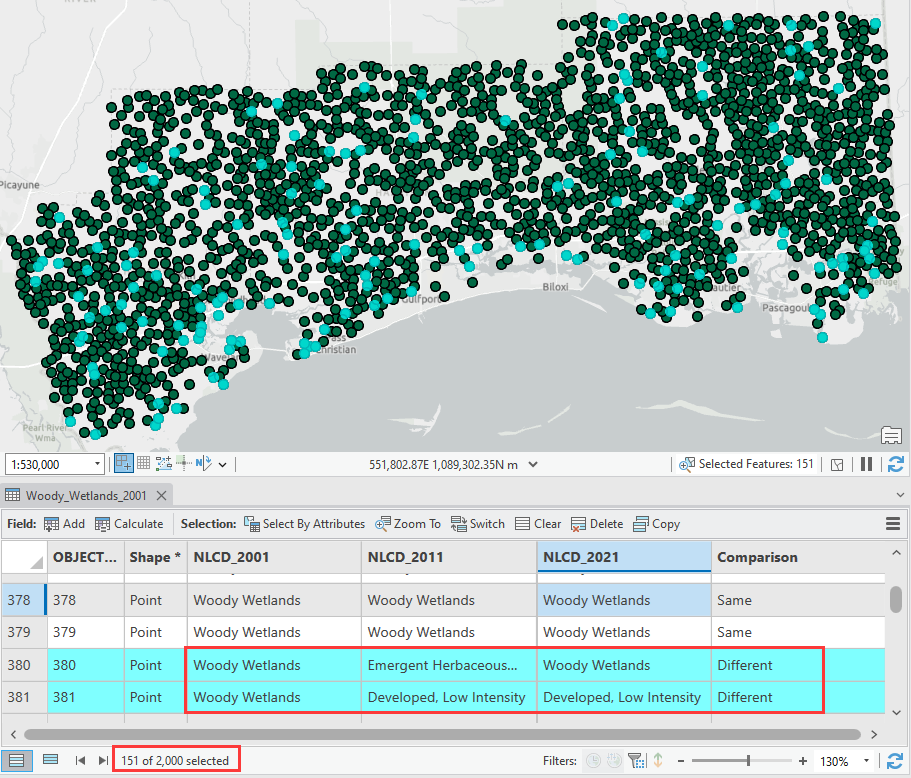
- Right-click on the Woody_Wetlands_2001 layer and open its attribute table. Check the number of records and review the existing fields. The table includes 2,000 records, where each record is characterized by three NLCD-related attribute fields (NLCD_2001, NLCD_2011, NLCD_2021). All attributes under the NLCD_2001 field specify only one category: Woody Wetlands. The other two fields primarily categorize the attributes as Woody Wetlands as well; however, they occasionally represent other land classes. Think about your approach of comparing row values in the NLCD-related fields that would allow you to identify categories other than Woody Wetlands.


- Examine the NLCD_2011 and NLCD_2021 fields and their attributes by scrolling down the table. As you can see, a visual assessment of 2,000 records for three different fields is time-consuming, so you need to find a better approach to complete this task. For now, you can close the attribute table.
Step 2. Building a Simple Python Expression Using the Calculate Field Tool
You consulted the task challenges with the GIS analysts on your team, and they advised you to compare the available NCLD-related fields and determine how many points classified as Woody Wetlands in 2001 represent the same land cover according to 2011 and 2021 classifications. You settled on the idea of automating this process by building a simple one-line expression using the Calculate Field tool. Here, you will find a detailed explanation of how you can accomplish this.
- To perform the analysis, search for “Calculate” (Analysis tab > Geoprocessing group > Tools). Click the Calculate Field (Data Management) tool and fill out the required parameters, as described below.
- The Input Table should be the Woody_Wetlands_2001 file. Note that this tool does not create a new output file, so all changes will be made to the Woody_Wetlands_2001 file. Make sure that no records are selected in the table. Once the selection is made, the calculation is executed only for the selected rows.
- In this case, you do not want to change any of the existing fields; therefore, you need to create a new one. Name the new field Comparison, and from the drop-down list, select Text as the Data Type. Note that the type of field you need to create relates to the type of attributes that you will add, and in this example, the attributes are a text type. Make sure that Python 3 is selected as the Expression Type.
- The single input line, just below the Fields and Helpers options, is known as the Expression Line. For many basic tasks, including this one, it is completely sufficient. When compared to other standard input lines, it has the option to expand to fit the entire length of your syntax. Note that Comparison = was added just above the Expression Line. This is helpful and clearly specifies the name of the field you are about to calculate. The idea here is to return a value of Same in case all NCLD-related fields are identical, and otherwise a value of Different. In Python, we do this by using the if-else statement that typically requires a Code Block section to complete a field calculation. Here you will use a one-line Python expression, and this approach allows you to skip the Code Block altogether. The Python expression is structured as x if condition else y; where x is returned provided that the tested condition is True, and y is returned when the tested condition is False. Now, you are ready to construct the conditional statement. Place the cursor inside the Expression Line and type in the following expression:
- Before you push the Run button, you need to be familiar with a few more concepts. For example, in Python, we use straight quotes around text inputs; otherwise, the expression will not run correctly. This rule applies to Same and Different input attributes. Note that you can type the entire expression, including the field names, into the Expression Line manually, but to reduce potential typos, it is easier to double-click on the names shown under the Fields menu. It may surprise you that the field names are enclosed in the exclamation marks. This type of notation is specific to the Python ArcGIS Pro Expression Line arguments and allows your code to recognize the individual values for each of the records referenced by the specified field name. The exclamation marks are added automatically once you double-click on the field name. Also, pay attention to Python’s equality operator (==). Its function is to compare records based on their values.


- Confirm that your inputs match the earlier image. Click the green check mark button to verify that the expression is valid. If needed, repair the errors, and once corrected, click the Run button to execute the calculation.
- Once the operation is successful, open the attribute table and evaluate the results.
- Select points where the Comparison field values are set to the attribute Different. Their distribution should look the same, as shown in the image below. Of 2,000 points, 151 have changed the land cover class at least once during the evaluated time frame. At this point, you are ready to share the results with your team members and present the outcomes to the Association of Wetland Specialists.

Caption
"Same" if !NLCD_2001! == !NLCD_2011! == !NLCD_2021! else "Different"
Conclusion
This concludes our GEO Tutorial on incorporating a conditional statement into a single expression line. The process presented in this scenario can be useful for looking into similarities between values in any two or more attribute fields. By making minor adjustments, you can use this workflow to evaluate text attributes, calendar dates, as well as numeric values. Beyond change detection studies, you can use this type of one-line expression to compare the results of different classification methods, evaluate datasets originating from multiple sources, or simply look for errors in the revised version of attributes. Remember, you don’t have to be a programming guru to incorporate small bits of Python code into your daily GIS tasks.
Geosystems Research Institute
The Geospatial Education and Outreach Project (GEO Project) is a collaborative effort among the Geosystems Research Institute (GRI), the Northern Gulf Institute (a NOAA Cooperative Institute), and the Mississippi State University Extension Service. The purpose of the project is to serve as the primary source for geospatial education and technical information for Mississippi.
The GEO Project provides training and technical assistance in the use, application, and implementation of geographic information systems (GIS), remote sensing, and global positioning systems for the geospatial community of Mississippi. The purpose of the GEO Tutorial series is to support educational project activities and enhance geospatial workshops offered by the GEO Project. Each tutorial provides practical solutions and instructions to solve a particular GIS challenge.
This work was supported through funding by the National Oceanic and Atmospheric Administration Regional Geospatial Modeling Grant, Award #NA19NOS4730207.


The information given here is for educational purposes only. References to commercial products, trade names, or suppliers are made with the understanding that no endorsement is implied and that no discrimination against other products or suppliers is intended.
Publication 4024
By Kate Grala, Research Associate III, Claire Babineaux, PhD, GIS Coordinator, and John Cartwright, PhD, Assistant Extension Professor, Geosystems Research Institute.

The Mississippi State University Extension Service is working to ensure all web content is accessible to all users. If you need assistance accessing any of our content, please email the webteam or call 662-325-2262.


